|
This is the 8th week of prototype loggings. Starting off: what I managed to accomplish this past week. I finished up on the projectile that the player uses to fight the enemy, so now the Player is finally able to defeat the boss. Next, the boss can now deal damage over time but is currently no longer able to move, as I need to re code how it works in the blueprint. Some challenges I faced first off, the projectile was moving sideways, and also wasn't dealing any sort of damage initially. It also moved sideways and was shot at the bottom at the players feet. The boss also couldn't take damage while I was programming the projectile. I ended up needing to change a node from the roaming blue print of the boss to make it so that it can take damage. Also Having to change other points of the code and adding new variables. Not many good things happened for this week as I had to shift things around. Im hoping to finish up the win and loss screens next week and fix up the enemy roaming. 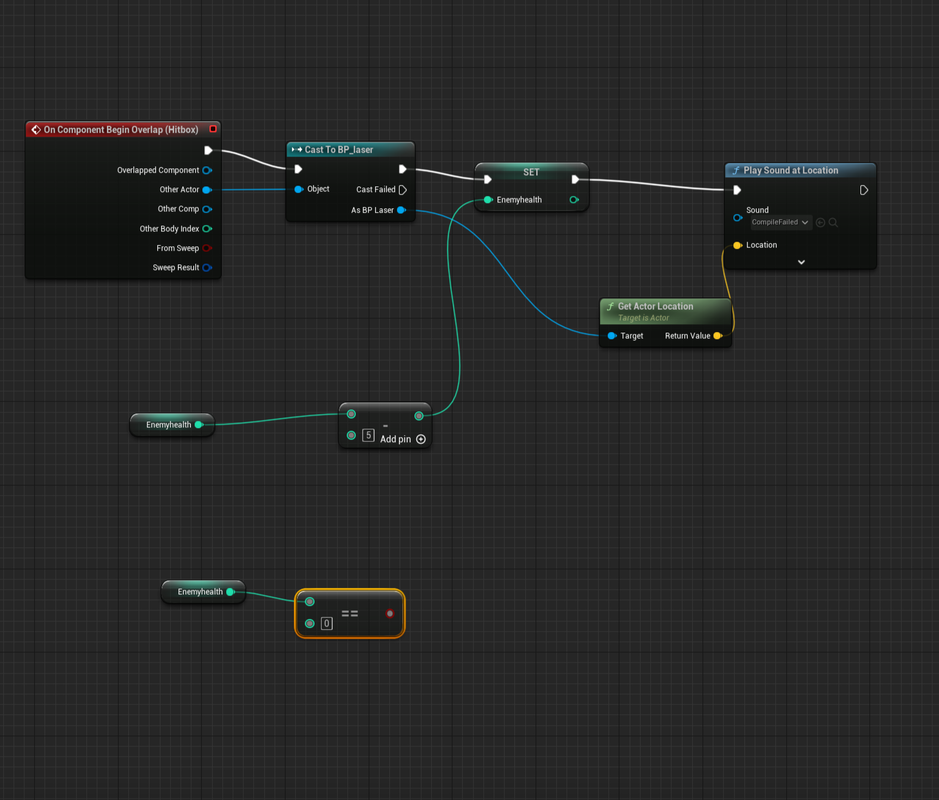 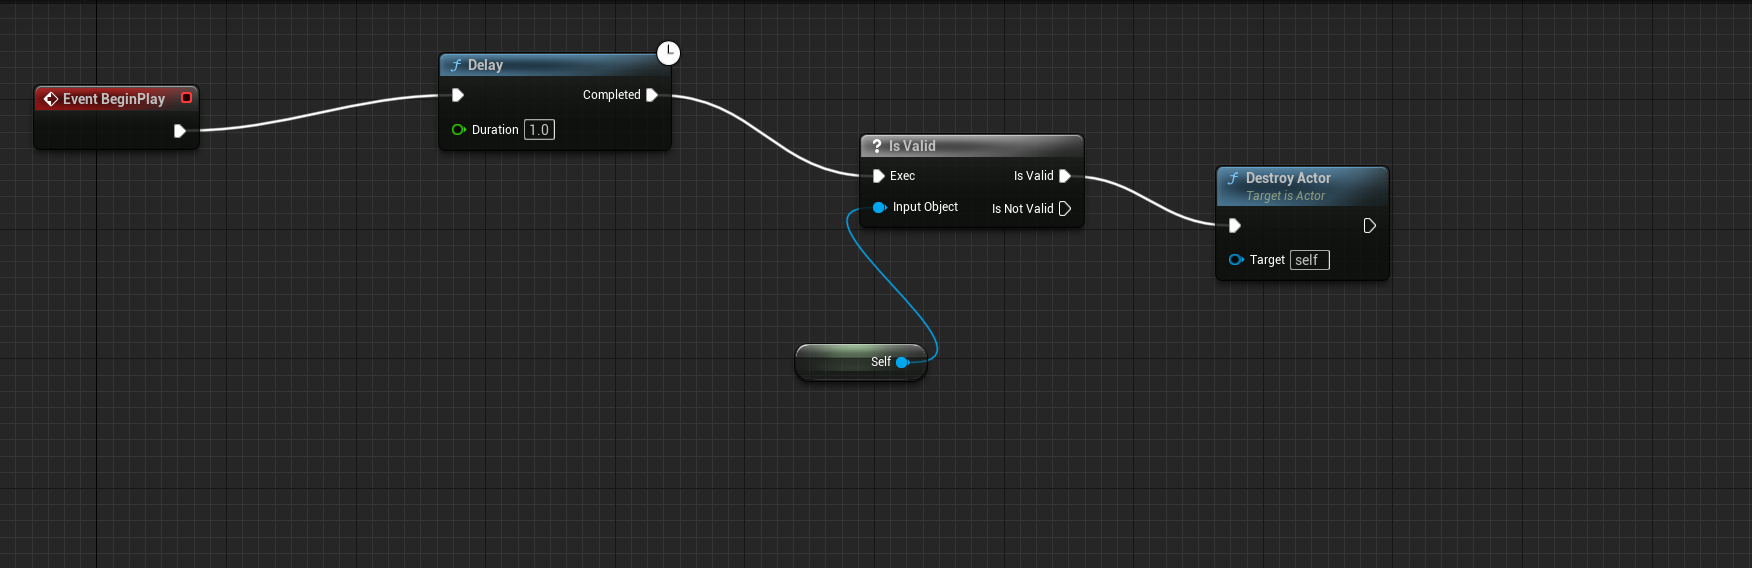 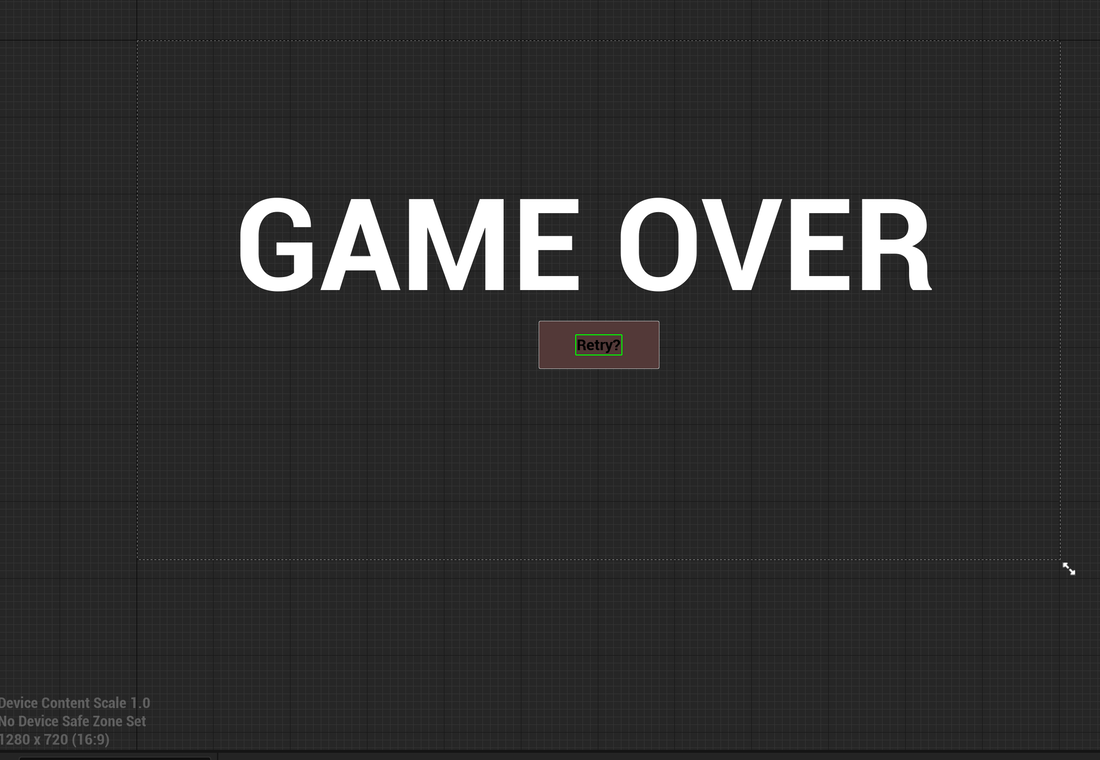 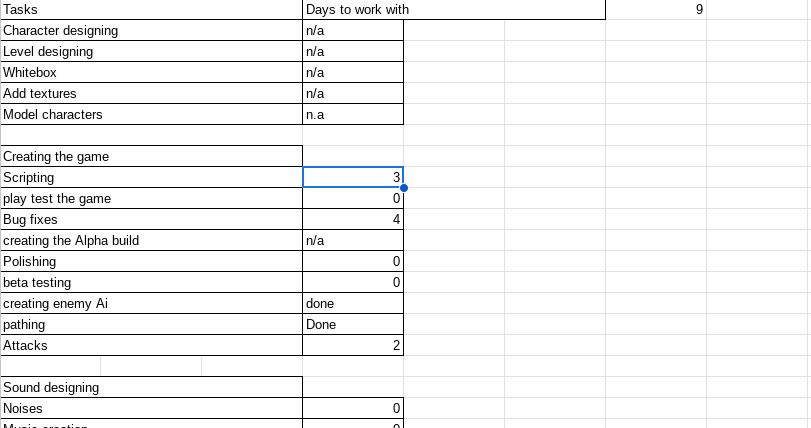
0 Comments
For this reflection I will be discussing about the 5th week of trying to create a game. Starting off what tasks or parts did I work on this week. I implemented one new object and a simple ai that can move around. I also added back from the broken version of the project the health pick ups and the health bar. I didn't face any challenges as I simply added back a few blueprints and items as well as a simple AI. The good things that happened are also very few.   My plan for next week is to quickly add attacks for both the player character and the enemy. I have about 30 days to finish the prototype so I'm going to have to add the simple attacks and a simple health system. Which is upsetting as I wished to add items to the game to test them.
For this blog post I will be discussing the fourth week of my game development. It was going decently until I had attempted to import custom Animations into my game, which for an unknown reason had caused all animations to break in the game. So now I must start from scratch, however this will be simple since I already know what I want to add. Sadly I must now spend time re-adding all the blueprints That I wish to have added, but first I must re-add as well the objects incase one of them is broken from the original version of the project. This is sort of good as now I will be able to fix anything I found off about the original map that I was making. I am hoping by the end of next week I will have not only rebuilt the game but get further than this past week. More specifically Completing blue prints for weapons, items, and the boss's attacks. 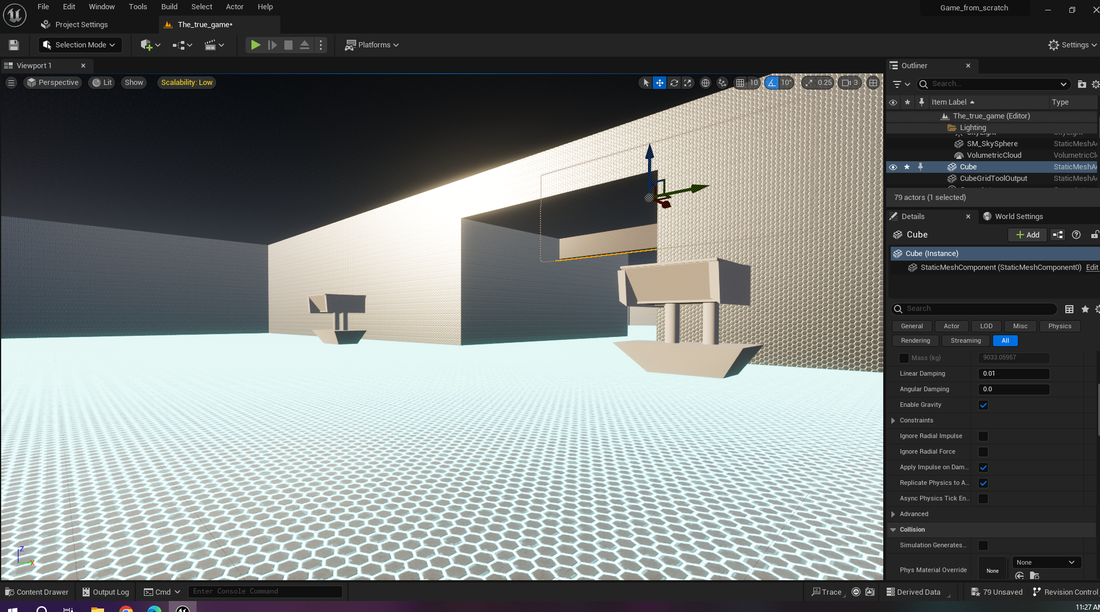 In this blog post I will be discussing how well my prototype for my game is going. Starting off, what did I accomplish this week. I worked on some assets creation as well as a health system with health pick ups. I did come across the challenge of getting rid of the health pick up, as well as how to implement them since this is new to me. I overcame the challenges by simply looking up tutorials as there are many that helped. My plan for next week is to hopefully implement some items for the player to pick up and use if they so wished. Sadly I could not implement a shop system that I wanted to so players can pick up items or weapons that they wish to try. However, trying to change what weapon and current item the player is carrying is going to be tough, and im unsure if I will be able to implement it next week. I may need to get models off the internet as the items I wish to implement would take too long to model my self. 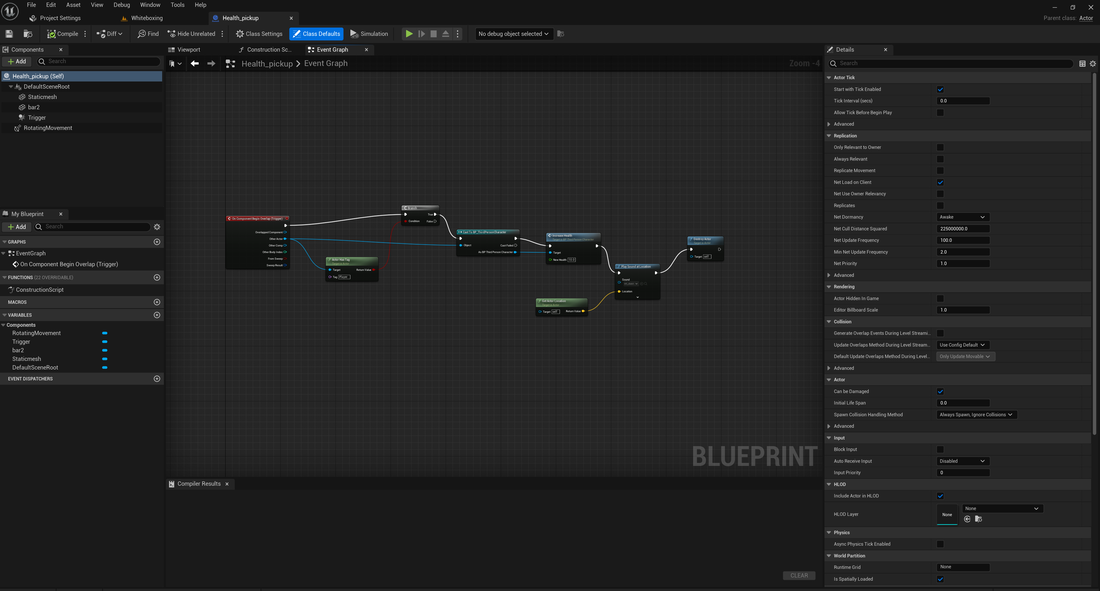 In this blog post I will be talking about some items and thing that I learned while doing tasks that were assigned in quarter 3. Starting off we have some landscaping work in UE5, this was really fun to do as I had to combine different areas of nature into one map, as well has creating natural hills and mountains and adding texturing to them using the landscaping tool. Next we had to plan out a schedule for the remainder of the school year that we have left, I believe I did pretty well in planning it out as evenly as possible. Then we had to create a basic white box for our game. I tried to make it as simply but as quickly as possible. I knew what I wanted for my basic shape I just had to create The place holder objects using basic shapes in UE5 and placed some spheres that would serve as the place holder for "characters" and the player them self. Next came the asset creation which was fun to say the least. I enjoyed creating many models for my game even if it was just simple modeling, it was fun trying to find ways to make the assets that change from the simple place holder assets so something that you would actually see in the setting of the game. Then lastly we had to do grey boxing. Adding materials, textures, and assets into the game and giving it more detail than the white boxing ever had.
For this blog post I will be talking about Greyboxing, which is an extent from the whiteboxing I did. for greyboxing you simply add more detail than what you added from your white boxed map. For all the changes visually there will be a "walk through" on the GAD page. For starters all the models currently used were designed by me, built by me. The stands, floor traps, wall traps, and while slightly untouched, the upgrade bench in the middle were all changed. I selected to use these specific models as 1: I thought it would give players an easier time to see what they could interact with and 2: because the way they were originally were too baron and simplistic in white boxing, so I changed them to give them more unique looks. Since grey boxing needed more details the wall obstacles and the wall of the rooms themselves, as well as the floor all had materials from the basic UE5 material section used. but seeing as how they were mostly metal, plus the unique hexagon designs for the room floor and room walls. I wanted the stands and bench in the man room to be a solid grey for a more smoother metal, where as the wire traps, wall traps, and health items are meant to bring out the color of the room.
For this blog post I will be talking about the process of white boxing out my level. Firstly: how I converted my level plant to a whitebox environment. I took a sketch that I had made for both the "hub" area and the "arena" area and used that while using the cube grid tool in UE5. I tried to determine the scale for the environment and object by observing from a distance, sadly this meant I accidently over estimated how large certain objects were and made the areas too large. Even certain aspects like a simple pole was extremely large compared to how I wanted them to be. The most difficult part of whiteboxing the level out was actually seeing the level form in front of me and trying to make good level decisions so that it wouldn't feel so empty while at the same time trying to remember that I don't have to go too over board on details. As for skills I have noticed that whiteboxing kinda can be seen as related to using blue prints in UE5. Both skills require you to try and simplify how you want certain aspects of your game to look. The only difference is that white boxing is how you want your level to look while blueprints are needed to be simple to not need to use too much code.
fir this blog post ill be talking about a personal game that I had made. It was a simple "horror" game where the player must survive 3 minuets in a maze while avoiding a monster. In the slideshow below I show off two of the blueprints that I used in ue5 to create the game mode it self as well as the monster. It was a fun experience, but unsurprisingly it didn't start off great. I had spent the first few days we had to do this trying to implement a lock picking system only for it not to work. Having only three days left I decided to simply try and throw together a blue print for simple random roaming. Then I created a simple maze by putting some walls to try and create multiple path ways for the player to get lost in. This was very enjoyable, and even though I had to scrap out an idea for lock picking I still am glad that I learned how to partially code it in the first place. and in trying to do so I also learned how to port from 3ds max to ue5 For this blog post, I will be talking about the creation progress of a "test" game for the fps genre. I will be describing the process as closely as I can starting with the code. The code type we are using is blue prints as we work in unreal engine and also because it's the easiest. The blue prints were simple to use but they were very long and tedious as the picture Below shows. Lots of connecting nodes to others, using integers and Booleans, as well as using branches to check if something is true or false, but in the end it was very satisfying to pull off 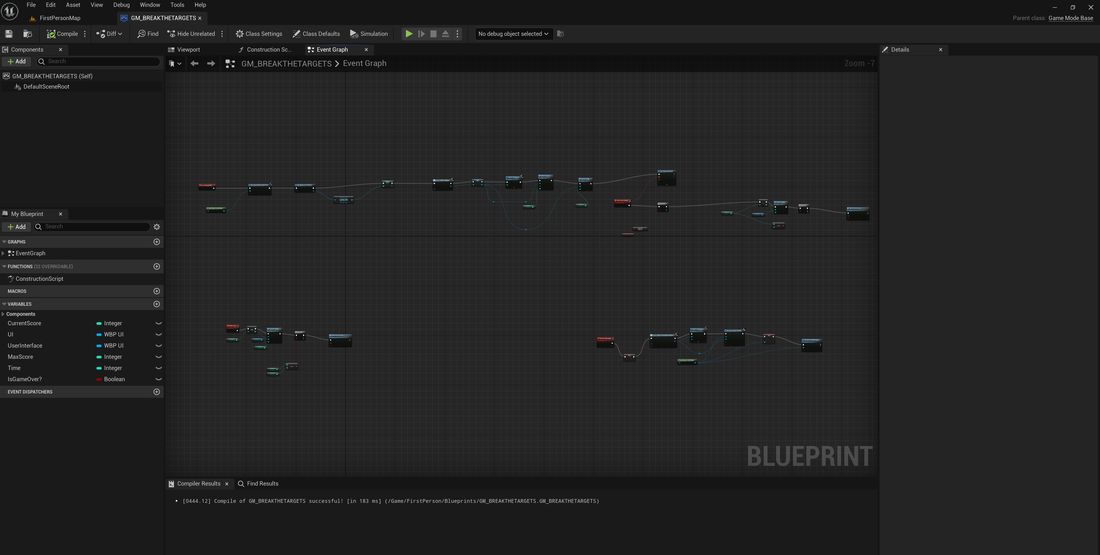 Then next was play testing the game, Which wasn't hard. All that I had trouble with was the targets breaking when shot, and also needing some last minute textures as the dead line was coming closer. 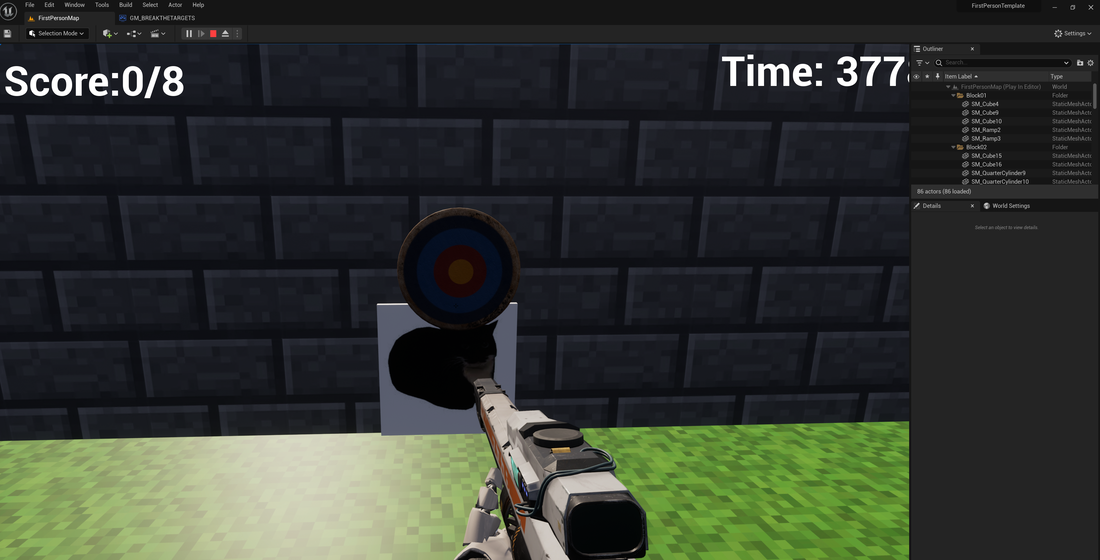 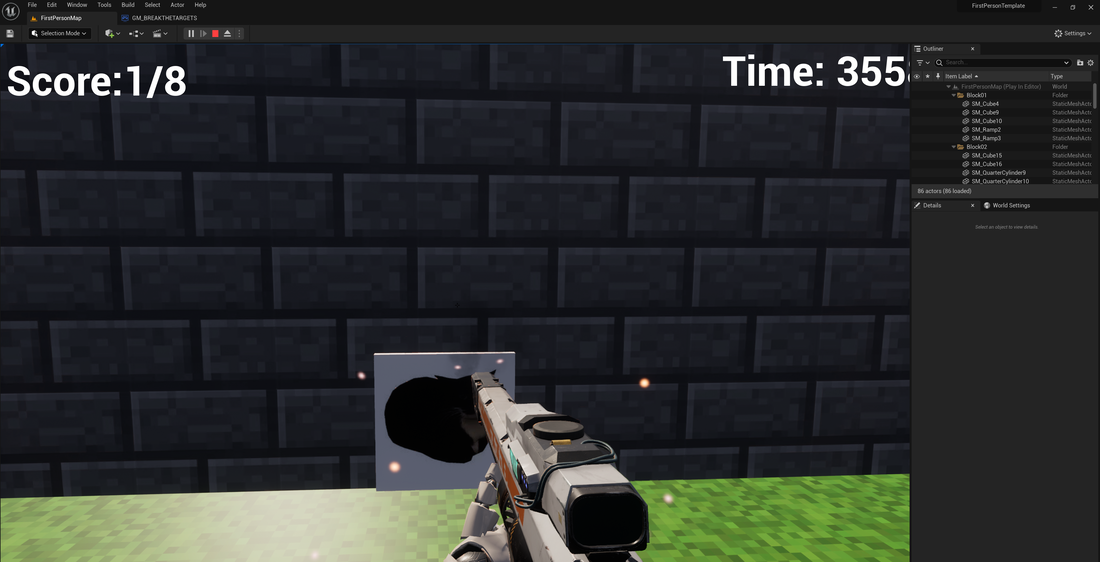 now obviously as a beginner this wasn't done by my self, in fact the game that the class made for this was the same as we all followed a very helpful tutorial. Which honestly was very fun to follow through, the easiest part was making physics for the targets as they just needed a check box to be clicked. But the hardest part was the bullets because on my end the bullets just simply won't go to the middle of the screen. But overall this activity was fun and I look forward to the next one.
For this blog post I will be discussing on how I created a house and a maze. But before that a note that must be made is that sadly the computer that I have can only run on medium graphics so it's not the best quality. So first the house which was pretty simple, by using snapping points and basic walls+windows provided in the starter folder, and by using a polygon morphing tool to create the roof and walls, The door was provided by the starter folder but can rotate because of a blueprint I created by following a step by step instruction. Then lighting (despite the fact that you cannot see it in the photos) was added. Then the maze, the maze was much more simple as it was just adding cubes from the grid up to create impassable walls and adding textures to everything. |
